 Bryan Harrison is the Technical Service Manager for the Thermalbond® spacer tape product line at Saint-Gobain. He kindly agreed to be interviewed for this blog post. All images used are sourced by Saint-Gobain Tape Solutions.
Bryan, can you give us a little history lesson on the Thermalbond® portfolio? How long has it been around and what prompted its’ development?
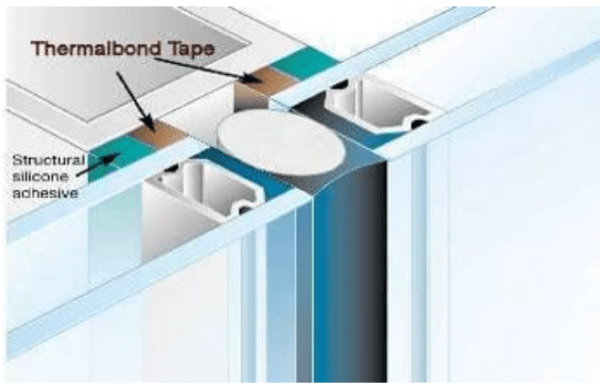
Sure. We were approached when structural glazing was really getting off the ground. It was 1978 and the industry knew that a structural silicone could do the job, but they needed a solution that would allow them to fabricate the facade while maintaining spacing until the one part structural silicone cured. Back then the glass would be held in place with Dutchman clips for 21 days until the silicone fully cured. The first job that we did was a Saks Fifth Avenue retrofit in Pittsburgh. It was mirrored glass glazing and we used the V2100 series. They came to us and explained the criteria; avoiding three-sided adhesion, an open cell structure to allow moisture in, and a high performing adhesive. In 1985, we launched a sister product (to the V2100) V2200. It was a darker shade of black to better match most of the structural silicones being used. Also, a lot of the glazing was starting to be performed in a shop environment rather than on site so things were easier to control. For example, you don’t have all the issues of field glazing with the outside of a building in the elements. Around the 2010 timeframe, structural glazing trends shifted to using more gray colored silicones. We launched a gray color option meant to address that trend. It’s not meant to be an exact match for any one gray, but it’s meant to blend in when you’re stepping back and viewing the building. In 2012, we launched Thermalbond® Xpress. It was really designed to continue the move toward design flexibility. It has features that allow it to be used in applications where you don’t need adhesive on one side, want easy repositionability and a very consistent look through glass.Can you describe in more detail how the Thermalbond® structural spacer functions in the application?
At the start of the fabrication process, you clean your frames and get those ready to apply the Thermalbond®. You apply the adhesive on the face (unwind) side of the Thermalbond® to the frame. You can proceed with attaching the glass immediately or may tape several frames first (in a batch process). The blue release liner is left in place until you’re ready to apply the glass, marble, or other material to the frame. Typically, people use small pieces of wood as spacers to help get the glass properly positioned. You then pull out the blue release liner to the side and work your way around the frame removing the wood pieces as you go to produce a nice, smooth appearance. The adhesive system is strong enough to allow the unit to be moved to another station immediately. At that point, the structural silicone is dispensed around the perimeter and the Thermalbond® maintains the space. The open cell structure allows any gas to escape and permits moisture penetration to help facilitate sealant cure. Some shops will stack the units vertically but most will stack horizontally or put them right into a shipping container.When you think about Thermalbond® versus other competitive products, what makes it distinct and unique versus other materials?
I already mentioned the open cell structure. The idea behind that was that structural sealants require moisture to cure and we really want to get the maximum amount of penetration, especially when you’re on the side of a building. Most polyurethane foams are water blown. Thermalbond® is a different type of technology. The cells are very fine and discreet. If you look at the edges, it looks just like a closed cell material. Some of that is for the aesthetics but also for its’ ability to hold weight. Several years ago, we instituted a branded liner on the Thermalbond® line. We did that because we were starting to see counterfeits from overseas. If you’re counting on a spacer to make sure that your structural silicone sealant project is done correctly, you want to make sure you’re getting the right material. We then introduced new technology with Thermalbond® Xpress. You don’t have a release liner with this product so there’s very little subsidiary waste and it lets you apply the product very quickly anywhere on the surface. From an aesthetic standpoint, there’s a huge advantage with the way the air / glass interface looks, much more consistent. It does have some real advantages for flooring applications.
Beyond that is silicone sealant compatibility, which of course is the starting point for everything. If you aren’t compatible with the structural sealant, you have a big problem.
You don’t have a release liner with this product so there’s very little subsidiary waste and it lets you apply the product very quickly anywhere on the surface. From an aesthetic standpoint, there’s a huge advantage with the way the air / glass interface looks, much more consistent. It does have some real advantages for flooring applications.
Beyond that is silicone sealant compatibility, which of course is the starting point for everything. If you aren’t compatible with the structural sealant, you have a big problem.